Friday, November 20, 2009

Wanna win a FREE Gypsy

Wow, I am so excited to tell all of you about this great giveaway over at http://the-gypsyspot.blogspot.com/. If you would like to win a free, yes I said FREE Gyspy then dash on over to the gypsy spot and get all the details. This is so so exciting. Good luck to all who enter. This is going to be so much fun......

Saturday, November 14, 2009

gypsy spot DT shaped card


This week over at the gypsy spot Nilda asked us to make a shaped card. This is my first try at a shaped card with the gyspy but I was pleased with the results. I really had no idea where I was going to start with it. Then it came to me, people fall in love at all times of the year and I was thinking ok, this is fall.....fall 4 you....that will be my card. so I made the card the shape of a pumpkin then added the number 4 and the letter u. I absolutely love this fall paper pack from DCWV. I have almost used my whole pack. I inked the edges of everything and this is the final result. I hope you enjoy looking at it as much as I enjoyed making it. I am sure I will be making a lot more shaped cards as fun as this one was to make. Be sure to go over to http://the-gypsyspot.blogspot.com/ and check out all of the other ladies great cards. This design team has some really great talent so be sure to check out all of their cards. Thank you so much for looking and for commenting. YOur comments mean the world.

Monday, November 9, 2009

Gypsy Spot design team challenge


This week over at http://the-gypsyspot.blogspot.com/, Nilda asked us to make something using the weld feature. She wanted us to weld a shape and also weld letters together. I decided to make a snowman completely from George, although I did have to use Mickey and Friends for his hands. I am really proud of how he turned out. I used all ovals and circles for George and then the vest and hat I put on him I got from PDDU. I cut a scrap piece of paper for his nose and then drew his face on and added chalk to his cheeks, the paper is some of my new paper that I just got from stampin up. I really do like the whole pack of this paper. Be sure to go over to the gypsy spot and see all the other creations that all the other talented ladies created using the weld feature and be sure to play along. Hope you tune in next week to see what all of us create next time. Thank you so much for looking and for commenting.

Saturday, November 7, 2009

The Lord is my Shepherd


Monday will be my Dad's birthday. I lost him 6 years ago to brain cancer and I have to tell you, it never gets better. It does get easier but it never gets better. I miss him more than words can ever say. I know that he is with me everyday watching over me. I made this card in memory of my dad. He walked so close with God while he was here on this Earth living everyday by his word. I got the idea from a picture that has been in my house for years. My mom had it in our house growing up and I have it in my house now and I am sure that so many of you have it in your house too. It is the Home Interior picture of the old church with the sheep in the field and it has on the front of it "The Lord is my Shepherd". This picture is hanging in my guest bathroom because a very dear friend of mine told me once that you should always have a scripture of some kind hanging in your bathroom because whenever you have company over they are sure to use your bathroom so you want them to be able to see it. I have to tell you, I have a scripture picture/plaque of some kind in every room of my house because I want to make sure that no matter what room people are in at my house they will know that I live by God's word. On the outside it says "The Lord is my Shepherd" and on the inside I put the entire verse on the left hand side and left the right hand side blank. thank you so much for looking and thank you so much for commenting. They really do mean the world to me.

poinsettia card


I love Christmas time. It is my absolute favorite time of the whole year. I usually end up with several poinsettias around the house because I think they are just so pretty. I wanted to see if I could create my own layered poinsettia with my Gypsy. I was so happy to see that it was coming together the way I wanted it to. I used plantin schoolbook's leaves for the poinsettia and welded them together to a circe from George. Put a ribbon behind of it and added the fuzzy pom poms to the center. I hope you like how it turned out. I am just loving my gypsy. I love the idea that you can create so many new cuts. Thank you so much for looking and thank you for commenting.

Saturday, October 31, 2009

Autumn- the Gypsy DT first challenge


For our first challenge for the Gypsy DT, Nilda asked us to make a card using the Gypsy Wonderings cart. I used several different cuts from this cart on my card. First I used the leaves and made a border out of them by welding them all together. Then I cut more leaves out in different prints and added them to the welded border and also to the bottom of the card. I also put some in the inside of the card as well. I also used the GW cart for the pumpkins, I cut three of them out both on regular and shadow and mixed the layers together to give them more color. The word Autumn is also fromt he GW cart and I cut it out on regular and shadow cut. I even got the diamonds that are behind of Autumn from the GW cart and then added the strip of ribbon and lots and lots of ink. I am really pleased with how it turned out, I hope you like it too. I can't wait to see what the other oh so very talented ladies have come up with for this challenge too. Be sure to check their cards out here. http://the-gypsyspot.blogspot.com/

Nilda wanted us to showcase how we created our cards and I couldn't think of a better way than to show you the same way that Jeannie does her cards by giving you a snapshot of the gypsy board. I hope you can tell how I layed everything out of the mat. One of the greatest things about the gypsy is that you can cut the entire card out at one time. All you do is measure your paper and put it on the mat the same way you have it layed out on your gyspy mat. It is so great to be able to cut every single color all a the same time. It sure does make card making faster..... Be sure to hop over to the gypsyspot and check out all the other very very talented ladies takes on this challenge. Thank you so much for looking and thank you for commenting

Thursday, October 29, 2009

peace symbol card


One of the girls that I work with asked me to make a card for her daughter who is getting ready to turn 12. She loves pinks and purples and is really in to the peace sign. She asked me if I could make a card with the peace sign on it so of course I say yes, because even if I can't find one on one of my carts then I can create one in gypsy....yeah! That is exactly what I had to do. I couldn't find a peace symbol on any of the carts so I started working with my new favorite little toy and this is what a came up with. OMG, I love my Gyspsy! The circle is actually a Christmas ornament and I used two rectangles from George to weld to the Christmas ornament to make the symbol. After I cut the ornament out I just snipped the hook off. She is really into music too, of course what young girl isn't, so I added some music notes from the JOTS cart. The flowers are from George. I hope she likes it and thank you so much for looking and for leaving a comment. I treasure every one of them.


Thursday, October 22, 2009

There's no place like home, there's no place like home


Last week at WSB we were asked to make a card or layout using this picture. At first I made a birthday card and just wasn't happy with the end result because this picture really was screaming Wizard of Oz at me. I just really thought that the lady in the picture looked like Glenda from the Wizard of Oz, so I made another card using the Wizard of Oz as my theme. I decided to keep the balloons and weld them to the house, using my gypsy....love my gypsy and make a house warming card with "there's no place like home" as the theme of the card. This is what I came up with. I hope you like it. I inked around the edge of everything and used lots of pop dots. thanks for looking and thanks for leaving a comment. They really keep me going

New Gypsy Spot Design Team

I am so so excited. I have been chosen to be on Nilda's brand new design team over at the gypsy spot. Check out the blog here. http://the-gypsyspot.blogspot.com/ I have been having so much fun playing with my Gypsy and learning all I can about it. I am so excited to get to work with all of the great talented ladies that is going to be on the DT. Be sure and check out all of their blogs too. I am ready to jump in with both feet, gypsy in hand and tackle all of the great projects that Nilda gives us to do. this is going to be so much fun!

Saturday, October 10, 2009

Halloween card for design team


I am on the design team for Wimsical Scraps and Bugs. For our first "Celebration" Challenge....
we were assigned a 3-2-1 Challenge!

3 Colors.... Orange, Purple & Black
2 Stars.... from any Cricut Cart you have
1 Stamped Image

This is what I came up with. The pumpkins are circles and ovals from George, the starts are also from George and the bats are from PDDU. The stamped image is from Stamp up! This card will actually be given to Merrill for letting me borrow her stampin up stamps. I hope she likes it. The ribbon in the upper left hand corner and the pumpkin paper on the inside came from my dear dear friend Joy Sikes who sent me a bunch of goodies. Thank you Joy!

Thank you for commenting and I hope you like it.

Thursday, October 1, 2009

WOW- check out Karelj's October Challenge

I hope everyone will go over to Karelj's blog and check out her October challenge .
Her challenge for you is to make a creation where little gems are prominently featured. It could be a card with Skittle Centered flowers.....a scrapbook layout with Skittle-tipped scrolls....a lovely twinchie with Skittle eggs in a nest....whatever your heart desires....as long as it has Skittles on it!
Your prize will be a package of 1000 clear Skittles to color as you'd like with dye or Sharpies and a set of 2,400 multicolored Skittles, each in their own sweet little pot. You'll also receive some *real* Skittles....packages of the yummy fruit candy that gave the embellishments their name.

what a great prize to win.
http://karelj.blogspot.com/

Monday, September 28, 2009

romantic card in black and creme


I think this could possibly be one of my favorite romantic cards that I have made. I am really proud of how this one turned out. First of all I absolutely love this paper, OMG, it is so pretty....and it is all Donna's M's fault that I bought it too. This is from the DCWV creme stack. this particular piece that I used on this card is flocked. I really do wish you could see it in person, it is the greatest paper. I actually bought the stack to do pages in my wedding scrapbook but I had to do a card with it first. Now I may have to buy another pack for my scrapbook and use all of this pack for cards. I wish also that you could see the center heart. It just sparkles The heart is from the wedding cart cut on 4", both on shift and regular cut. I really like the look of the center of the heart, it was super easy but the final look is really great. I went around the entire piece of white paper with stickles then I took white glitter and sprinkled it all over the heart. The stickles dry raised so the heart looks like it has a raised glitter center. It really is pretty in person. Then I used the jasmine corners and added black stickles to those, the love is from Beyond Birthdays and the butterflies were MS, and they are layered and then I added white stickles. Even Todd said this is one of my prettiest, which is a lot coming from him. Usually I get that is real pretty sweetheart. This one he actually did a good bit of commenting on. Made me feel good. I hope you like it too and please leave me a comment, I love to read them.

Thursday, September 24, 2009

Blog Hop, this is going to be so much fun

Well as many of you know I am on the design team for Whimsical Scraps and Bugs. We are having a blog hop that starts today, September 25th. This is going to be so much fun.

You will start at scrapsketch. You will then be directed to each blog participating in the blog hop. Each challenge blog will have its own special challenge for you and a chance to win prizes if you participate! The blog hop will last until midnight, October 1st.

Have fun blog hoping.....

You can find more information about the blog hop at the Whimsical Scraps and Bugs website-here is a link

http://whimsicalscrapsandbugs.blogspot.com/2009/09/blog-hoppin.html

Wednesday, September 16, 2009

floating ghost halloween card


OH OH OH, I am so excited for you to see this card! Oh I am just so proud of this card. I have had this card pictured in my head for days now, I just wasn't sure that I could make it all come together the way I wanted it to. I am so proud that it turned out right. I am also glad that it worked out that this could be and Jeannie/Vicki challenge card. Jeannie and I decided that it had been too long since we did a challenge card together so here is what we came up with. I picked the ghost from PDDU but didn't realize that there were two ghost on that cart so I made sure that I used them both on this card. I knew that I wanted my ghost to be suspended in mid air like it was flying but I wasn't sure how to pull this off. Well I actually worked with my wedding card idea and came up with the idea to hang the ghost from invisible thread and hang him from the center of cut out on the card. I hope the pictures really show how he is just floating in the air. I added layers of the zooballo grass behind of the ghost. I hope you can see that there are several layers of the grass. I inked around the edges to make it look better and of course I used lots and lots of pop up glue dots. I also added a spider to the grass area because what kind of card would a halloween card be without a spider. I also added two of the pumkins from PDDU and layered them and popped them up too and then I cut out ivy and inked and glued it around the pumkins. Added a moon and the word BOO to the left side and bats and stars to the right side. This obviously is a card that does better being left open. Go figure, a card that looks better on the inside than on the outside. On the outside of the card I added the cat, tombstone and other ghost from PDDU. I also put a lot of the inked ivy around the cat on this part as well. This card was way too much fun to make. I love it when I make a card that I am really excited about seeing it when it is done. I hope you like it and please be sure and leave me a comment. They mean so much to me....

Monday, September 14, 2009

Susan's birthday card


OK, you guys know that my daughter is the worlds largest Alice in Wonderland fan. I made her the one Alice card a few weeks ago as a thank you for giving me away at the wedding and so I thought I would use the rest of the Alice stuff that I have and make her a birthday card. She will be 20 on the 18th. Wow, it is so hard to believe that she is still not the same little girl that we used to have Alice in Wonderland "unbirthday" tea parties when she was little. Anyway, there is not much cricut on this card, just the greass at the bottom of the card from zooballoo. I hope you enjoy. I am not sure if you can read the verse of the inside of the card or not because of the glare of the paper but it is an Alice quote from the movie and it goes


"If I had a world of my own, everything would be nonsense.
Nothing would be what it is, because everything would be what it isn't.
And, contrary wise, what is, wouldn't be. And what wouldn't be, it would. You see?"
I think she will love it! hope you do too

You mess with the bull...


OK, I admit it....I am a child of the 80's and one of my all time favorite movies is the breakfast club. There are so many great lines from this movie but this one is one of my favorites and it just happened to work perfect with this card. Anna, a lady I work with, has a son that rides bulls for a living. Well, he fell off a bull a few weeks ago and got pretty bruised up. I wanted to make him a funny get well card so this is what I came up with. If you are a fan of The Breakfast Club you will remember this line. Bender who is played by Judd Nelson keeps calling the "self absorbed" principal whose first name is Richard by his nickname ( which is the nickname for Richard) well the principal keeps taking it and taking and finally looks at Bender and says "You mess with the bull youngman and you're gonna get the horns....and lengthens his detention. If you have never seen this movie then I highly recommend watching it for a good laugh. Anyway, I hope he likes the card and I hope it puts a smile on his face.

Wednesday, September 9, 2009

sympathy card for best friend


This is a sympathy card that I never wanted to make. I tried to make it the biggest card I could make because I want her to know how very very sorry I am. My best friends husband decided at the last minute that he was going to go ride his harley instead of coming to the wedding because it was such a beautiful day. When she told me that he wasn't coming I was ok with it because weddings aren't mens favorite thing to do. Oh man, how I wish he would have come to the wedding. He was leaving his dads house because he wanted to get home about the time that Sandy came home from the wedding. He was hit by a very young driver and both he and the driver were flown by helicopter to different hospitals. Sandy had the very difficult decision to make of taking David off of life support on Sunday. When she called and left a message on my voicemail I was just shocked. Words just can't describe the feelings that I had going through me. Here I was so elated from my wedding and she was going through such pain. I honestly don't know what to say to her. She told me to never let a second go by without letting Todd know exactly how much I love him because you never know when it will all end. Then she said "You are beginning your life with your husband and my life with mine is ending." What can I say to that. I love her so much, she has been there for me through everything in my life. My divorce, my father passing away, my new marriage....I have to tell you that I cried the whole time I was making this card. This is truly to hardest card that I have ever had to make. I don't want to make anymore cards for this reason at all...... I can't take all the credit for this card either. I just couldn't get my mind on a sympathy card so I looked at some of my favorite card makers out there and fell in love with Lillies sympathy card using the Lords prayer so that is what I went with. thank you Lillie for the inspiration. You have no idea how bad I needed it for this card. Please say an extra prayer for Sandy to help her get through this horrible time. She is going through so much right now. Her oldest son is in Iraq and won't be able to make it home for the funeral so please say a prayer for him as well. I have to tell you, my heart is breaking making this card.....

Sunday, August 30, 2009

stationary box filled with goodies


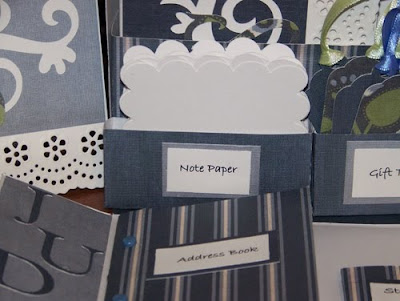
I am really proud of this oh so easy project. The lady that is marrying Todd and I on Saturday is fighting her 3rd battle with cancer. The first two times it was breast cancer now this time it is bone cancer from the breast cancer. I wanted to make her something very special and thanks to Marie (aka ~~me~~) I was able to do that. The other day while looking around on the mb I saw her post of where she makes these stationary boxes. I thought they were just great so she kindly shared her recipe for them. I am in love with these, I plan on making many many more. The cards I monogramed with her initials using the storybook cartridge, the note paper is nothing but 3 1/2" scalloped squares cut from mini monograms. The tags were cut from George at 3" and then I ran ribbons through the top. The address book is nothing but notebook paper and then printed paper hooked together with brads. I am going tomorrow to get her a book of stamps to go in the stamps slot. Judy going up the side was cut from Plantin Schoolbook and the flowers on the other side is George with stickles in the center. then I added an ink pink and tied a ribbon around the lid of the box. This was the first one that I ever did so it took me just a little longer but I plan on making many many more of these. Thanks again Marie, I think you helped me make the perfect gift....